 I've removed the tail wheel now that the plane is back on the mains. I think I'm shocked at the neglect. It has been so long since being greased that the grease had dried out back to paraffin. Grease is made by melting paraffin wax and adding #30 oil to the mix and letting it cool. It takes a very long time to dry out this bad in a closed space like the wheel or arm and cam assembly. Fortunately the plane came with 2 tail wheel assemblies. Like all steel parts the springs were rusty but they cleaned up fine. One tire is dead and the other is serviceable. The wheel bearings are all shot. I'll save one set as an example of just how bad bearings can get. The inner races on one wheel are like furrows in a plowed field. I've found new Timken A4050 bearings on e-bay for about $55 shipped so hopefully they really are new as advertised. The rest should be a matter of cleaning, painting, greasing, and new hardware. I'll have to fabricate new rubber pads for the springs. I have some 70 durometer rubber which should work fine. The tubular rubber piece which goes around the bolt in the spring holes is fine so that's good news. I should have everything ready by the time the bearings arrive. This is the same tail wheel we have on the Fly Baby so any serviceable spare parts will always be welcome.
 Thursday, April 21, 2011
Tail Wheel in Pieces
I've removed the tail wheel now that the plane is back on the mains. I think I'm shocked at the neglect. It has been so long since being greased that the grease had dried out back to paraffin. Grease is made by melting paraffin wax and adding #30 oil to the mix and letting it cool. It takes a very long time to dry out this bad in a closed space like the wheel or arm and cam assembly. Fortunately the plane came with 2 tail wheel assemblies. Like all steel parts the springs were rusty but they cleaned up fine. One tire is dead and the other is serviceable. The wheel bearings are all shot. I'll save one set as an example of just how bad bearings can get. The inner races on one wheel are like furrows in a plowed field. I've found new Timken A4050 bearings on e-bay for about $55 shipped so hopefully they really are new as advertised. The rest should be a matter of cleaning, painting, greasing, and new hardware. I'll have to fabricate new rubber pads for the springs. I have some 70 durometer rubber which should work fine. The tubular rubber piece which goes around the bolt in the spring holes is fine so that's good news. I should have everything ready by the time the bearings arrive. This is the same tail wheel we have on the Fly Baby so any serviceable spare parts will always be welcome. 

Wednesday, April 20, 2011
Brake Hoses
I needed to replace the dead brake hoses at the rudder pedals. The parts are cheap and the process is easy enough. Aeroquip has a sheet you can download which shows how to assemble 303 hose and fittings. The EAA also has a nice video. I realized after I got the parts that I don't own a mandrel for assembling 1/4" hose. It's easy enough to pay a local A&P shop to assemble and test the hoses or buy ready made hoses. I wanted to assemble the hoses. Everything I read on line said that the do it yourself mandrels you can buy (about $80) are too small a diameter to hold the hose open well during assembly. They make them undersized to fit well in used fittings for disassembling old hoses. The solution was obvious, make my own mandrel. I got out my box of drills and used them as plug gauges to find the inside diameter of the hose fitting, 0.170" goes, 0.172" is a no go. McMaster-Carr has 36" sticks of drill rod for about $3 so I selected 0.168" rod to make the pin for the mandrel.


Push the mandrel into the hose and hand thread the nipple into the socket as far as you can so you're sure the threads are engaging well. Then just wrench it in to leave the right gap, 1/32" - 1/16", between the nut and socket.
 The fittings add 1-1/16" to the length of the hose so wee need to cut the other end 1-1/16" short of our 11" length needed.
 With a short hose like this it's easy to look through it to make sure there is no bulge or cut flap in the inner hose. These 2 came out great. Now I just need to pressure test them and we'll have 2 excellent "Owner Produced Parts" to install and so note in the log book. Good fun!

I cut off a piece of rod about 6" long. By chucking it in the drill I tapered about 3/4" on one end with the belt sander and then polished it. For a holder I got a 1/4" AN 815 union out of the recycle bin as well as an AN818 Nut and AN819 Sleeve. It took some light pounding to drive the pin through union. The ends get squashed down when the fittings are tightens installing the lines in use. This same idea was used to with the nut and sleeve to squeeze the one end to hold the pin in the union.

The tape on the hose is so I can see how long I need to cut the other end of the hose to get the same length hose as the old hose. It also allows me to see when I'm done that the hose is still fully in the socket. For a small hose like this it's easier to use a socket wrench to screw the socket onto the cleaned up end of the hose. I use the belt sander to get a nice clean square end and blow the debris out when done. Remember the socket has left hand threads, snug it down and back it off 1/4 turn.

My camera caused this picture to rotate. I've turned off auto rotate so it won't do this again. The important thing here is I use some assembly oil, it's supposed to be slicker, to lubricate the inside of the hose and the threads on the nipple so it doesn't gaul the socket. After you tighten the nut and nipple on the mandrel oil the mandrel pin. You'll need to clean the the oil off the mandrel before you do the next fitting because the nut has to be tight enough not to spin while screwing the nipple into the socket. I also rinse out the hose when all done with a little mineral spirits. The oil is green so it's easy to see when you've rinsed it clean. A couple tablespoons of spirits will clean from each end.
The tape on the hose is so I can see how long I need to cut the other end of the hose to get the same length hose as the old hose. It also allows me to see when I'm done that the hose is still fully in the socket. For a small hose like this it's easier to use a socket wrench to screw the socket onto the cleaned up end of the hose. I use the belt sander to get a nice clean square end and blow the debris out when done. Remember the socket has left hand threads, snug it down and back it off 1/4 turn.


Push the mandrel into the hose and hand thread the nipple into the socket as far as you can so you're sure the threads are engaging well. Then just wrench it in to leave the right gap, 1/32" - 1/16", between the nut and socket.


Tuesday, April 19, 2011
Springs and Things

These are the flap return springs. Once the paint has dried well they can go back in the plane. They were a mess but still sound. I dipped the spring ends in primer and let them dry before priming and painting the rest. It takes a few light coats to get paint into the center of the coils, but with them stretched like this it worked fine.
 The skylight window mounting flanges needed a little work. The lip on the inside for the headliner was smashed so I made this tool for straightening them. I used a piece of aluminum angle and shaped it to the inside shape of the lip. I rounded it and tapered it at each end so I could work it into smashed areas. With some gentle work they came out great. Now I just need to find out how to install the windows so they never leak
Monday, April 18, 2011
Pulleys & Cables
Saturday was a rainy stormy day, perfect for re-greasing all the pulleys. All the old grease was dried on the bushings. Some MEK and a q-tip swap cleaned them up nicely. I re-greased them with the Molyshield grease I got for the engine. It's a #2 grease with 5% Molybdenum Disulfide to reduce friction. There are a lot of pulleys in a C-140. All the bolts, etc. are being replaced so I kitted everything for each pulley in it's ziploc bag.
 I cleaned all the cables with MEK. It was amazing how much grit had accumulated on the old grease. After cleaning they were inspected. One aileron cable had some broken strands so it will be replaced. The rest are all OK. I coiled each in a ziploc bag and oiled them with Corrosion-X. I did not oil the turnbuckles, they need to be oil free. Galvanized control cable is originally oiled to prevent corrosion. I'm sure it dried out ages ago.
I also reassembled the control tee and cleaned up the 2 return springs on the flap bellcrank. I'll repaint the springs with epoxy primer and epoxy paint. I believe it is a little more flexible than enamel and therefore may last a little longer before the springs start to rust again. If it weren't so expensive I'd paint springs with white epoxy primer only so any future rust would be obvious at the start and could treated before any pitting starts. I really can't afford a quart of primer just for that.

I also reassembled the control tee and cleaned up the 2 return springs on the flap bellcrank. I'll repaint the springs with epoxy primer and epoxy paint. I believe it is a little more flexible than enamel and therefore may last a little longer before the springs start to rust again. If it weren't so expensive I'd paint springs with white epoxy primer only so any future rust would be obvious at the start and could treated before any pitting starts. I really can't afford a quart of primer just for that.
Saturday, April 16, 2011
Cabin Touch-up
I've got the control cables out of the fuselage and started cleaning and inspecting them. One rudder cable has broken strands and will have to be replaced, good-bye $70. Mostly they're just caked with old dry grease and dirt. I'm cleaning them and re-oiling them with Corrosion-X since they were originally oiled to prevent corrosion. The turnbuckle barrels clean up nicely in carburetor cleaner. The threads have accumulated a lot of dry oily crud. They should not be oiled but they need to be clean to adjust them easily, much better. The trick of using a piece of soft flannel cloth to find broken strands was not needed on the one rudder cable, it was obvious to look at. 
All the little guards to keep the cables on the pulleys were originally plated. Not much of the plating was left. I cleaned them up, epoxy primed, and painted them. I used a silver paint to look more like plating but once the interior is installed no one will ever see them. Hopefully the paint will last better than the plating. I've also learned that zinc-chromate is a nice primer but needs to be covered with some kind of paint to seal it. All the steel parts with just light coats of zinc-chromate are rusty. Even zinc-chromate will work if you layer up enough coats to seal out moisture. I think it's easier to just paint them with a good enamel over the primer and get on with it.
There were several places in the fuselage cabin area where some extra cleaning and re-priming was needed. Those are done. I think I'm ready to start putting the controls back in.

All the little guards to keep the cables on the pulleys were originally plated. Not much of the plating was left. I cleaned them up, epoxy primed, and painted them. I used a silver paint to look more like plating but once the interior is installed no one will ever see them. Hopefully the paint will last better than the plating. I've also learned that zinc-chromate is a nice primer but needs to be covered with some kind of paint to seal it. All the steel parts with just light coats of zinc-chromate are rusty. Even zinc-chromate will work if you layer up enough coats to seal out moisture. I think it's easier to just paint them with a good enamel over the primer and get on with it.
There were several places in the fuselage cabin area where some extra cleaning and re-priming was needed. Those are done. I think I'm ready to start putting the controls back in.
Tuesday, April 12, 2011
Working In The Fuselage
Now that the plane is back on the gear I've started taking out the control cables and pulleys. All the brackets have some rust and the bushings need grease. I think I need a stand to hold the tail up while I'm working. Trying not to slide into the tail while using wrenches is to much work for an old guy. The Aileron Cables look good but they have so much old grease on them it's hard to tell for sure. I need to clean them up and then measure them and check for broken strands and rust. I also need to find the cross connection cable for the ailerons in the pile of extra cables I have. I must have enough cables for 2 planes since all the other cables are still in the fuselage.
Sunday, April 10, 2011
On The Gear Again
 After a rainy day yesterday it finally cleared this afternoon. The last wedge went in fine. This would have all been easier using a 7/16" universal socket. It's shorter than a socket and a universal joint, all 1/4" drive. There is not much space to work.
  As the sun sets it's nice to have it starting to look like a plane again. Now I can get the remaining control cable pulley brackets out to clean up, re-grease the pulleys and check all the cables. All the brackets are rusty so I'm sure I'll find more problems but they should all be minor.
 Thursday, April 7, 2011
Gear Back On
 The gear is finally back on. I still have 3 rivets to install on the skins around the gear. They need some modified bucking bars to get them in and I need to crawl in the fuselage to figure out what is needed. I haven't wanted to crawl in until the plane was off the stand. The rivets are also easy to get at with the gear on. I still need to install one of the wedges and torque the 2 attachment bolts.Someone had modified the skin on the left side to get at the wedge bolts better. I did those 2 wedges first without realizing how much easier it was with some room to work and being able to see what was happening.
  The right side has not been modified and is tough. On top of that the slight amount of primer I put on the gear, 2 coats, prevents the wedges from going in as far as they did in the factory. This requires longer bolts which adds to the problem. I did not repaint the wedges for that reason and wiped off any primer on the channels with MEK. The wedges are a very shallow taper so it doesn't take much to make a big difference. I got each wedge lined up with the bolt hole and then started the bolt in to assure it would be lined up free to turn it in. Then I pounded the wedge in tight per the Cessna 100 Series manual and tightened the bolt. Once I was convinced I had the wedge as far as it would go I checked the bolt with the mirror and found I had 1 - 2 threads through the nut plate, perfect. I don't trust that the wedges are in as far as they should be since I used AN4-10A bolts and the parts list shows AN4-5A. The bolts I removed were AN4-6A, but even then 1/4" longer bolts leaves me believing the wedges can go in further. I'll recheck them as we move forward and also after we start flying just to see if they can be wedged in further. I quit when it got dark and I got tired. It's still very cool to have the gear back on.
Wednesday, April 6, 2011
Bucking Bars
 I've started riveting the panels back over the gear leg openings. I had gotten some new bucking bars from Aircraft Spruce. When I went to use them I realized they mostly have sharp corners , (chamfered but not smooth and round), edges and some rough areas on the castings that need smoothing. Any edge etc. which might come into contact with something while bucking the rivets needs to be smooth so it won't scratch anything it touches. I'll spend a couple hours rounding all the edges and smoothing any areas which might touch something. You don't want everything smooth or they're hard to hold while bucking the rivets. I'm not really complaining about Aircraft Spruce. On something like these panels where you have to reach in through a hole to buck the rivets it's easy to touch the structure while bucking the rivet. If all this were being done by 2 people in nice open space it could probably be done without any worry of scratching things.
Tuesday, April 5, 2011
Engine Assembly Greases and Sealants
 I now have the rest of the greases and sealants to start assembling the engine. There are more listed in SIL99-2B but the work has already been done, plugs & breather elbow, or they don't apply, fuel injection, turbo charger, etc. The tube of Molyshield grease came from The American Lubricants Company in Dayton, Ohio, (800-543-9720 no website). They take credit cards and were happy to sell one tube. It's a #2 grease with 5% Molybdenum Disulfide for use on the valve stems and gear teeth.
.
The small tube of Dow Corning Molykote G-n paste came from Skygeek. It's for the cam shaft lobes and tappet faces. I've seen on line videos showing this stuff being slopped on the lobes and tappets. The directions on the tube say:
Apply a thin coating. For more effective application, burnish into metal surfaces by rubbing on with lint-free cloth. Remove excess. May be applied with short, stiff bristled brush.
Not everything you find on line is correct. I only hope I don't post incorrect info or at least someone will point it out when I do.
I now have the rest of the greases and sealants to start assembling the engine. There are more listed in SIL99-2B but the work has already been done, plugs & breather elbow, or they don't apply, fuel injection, turbo charger, etc. The tube of Molyshield grease came from The American Lubricants Company in Dayton, Ohio, (800-543-9720 no website). They take credit cards and were happy to sell one tube. It's a #2 grease with 5% Molybdenum Disulfide for use on the valve stems and gear teeth.
.
The small tube of Dow Corning Molykote G-n paste came from Skygeek. It's for the cam shaft lobes and tappet faces. I've seen on line videos showing this stuff being slopped on the lobes and tappets. The directions on the tube say:
Apply a thin coating. For more effective application, burnish into metal surfaces by rubbing on with lint-free cloth. Remove excess. May be applied with short, stiff bristled brush.
Not everything you find on line is correct. I only hope I don't post incorrect info or at least someone will point it out when I do.
Monday, April 4, 2011
Trim Wheel & Fuel lines
 I was concerned that I would not get a good seal on the old fuel lines. There was evidence people had worked to seal the fittings to stop fuel leaks in the past. The best solution would probably be to make all new lines. Instead I ordered some DEL 37 deg. fitting seals from Aircraft Spruce. They're about $2 each and I won't know if they work until I can leak test the lines. They're soft aluminum caps which fit on the end of the fittings (shiny ends on fittings). They intall easier on new fittings, but by lining them up squarely on the fitting and then slowly turning the fitting while gently pushing down with your finger tips they go on well. They stay fairly well but will fall off a new fitting so be careful they are very fragile. They're so soft I'm sure they will seal very well.
I also cleaned up and re-greased the bearings for the elevator trim tab wheel. The wheel is straight forward to re-install using the procedures in the 140 Operation Manual or the 100 Series Service Manual. The service manual does not have the cable tension spec for the 140. It did have one piece of information I could not find in the Operation Manual. There was no spec for oiling the chain in the Operation Manual because none of the control chains are supposed to be greased or oiled. It would seem they were more concerned with it picking up dirt if oiled than reducing friction. Many slow moving parts are better not oiled. When I cleaned the chain in some MEK I was shocked how much grit washed off it from someone oiling it in the past. The chain didn't even look dirty. If I ever detect any rusting I'll use the Corrosion-x to lightly oil it, but for now it is cleaned and moves very freely.
I was concerned that I would not get a good seal on the old fuel lines. There was evidence people had worked to seal the fittings to stop fuel leaks in the past. The best solution would probably be to make all new lines. Instead I ordered some DEL 37 deg. fitting seals from Aircraft Spruce. They're about $2 each and I won't know if they work until I can leak test the lines. They're soft aluminum caps which fit on the end of the fittings (shiny ends on fittings). They intall easier on new fittings, but by lining them up squarely on the fitting and then slowly turning the fitting while gently pushing down with your finger tips they go on well. They stay fairly well but will fall off a new fitting so be careful they are very fragile. They're so soft I'm sure they will seal very well.
I also cleaned up and re-greased the bearings for the elevator trim tab wheel. The wheel is straight forward to re-install using the procedures in the 140 Operation Manual or the 100 Series Service Manual. The service manual does not have the cable tension spec for the 140. It did have one piece of information I could not find in the Operation Manual. There was no spec for oiling the chain in the Operation Manual because none of the control chains are supposed to be greased or oiled. It would seem they were more concerned with it picking up dirt if oiled than reducing friction. Many slow moving parts are better not oiled. When I cleaned the chain in some MEK I was shocked how much grit washed off it from someone oiling it in the past. The chain didn't even look dirty. If I ever detect any rusting I'll use the Corrosion-x to lightly oil it, but for now it is cleaned and moves very freely.
Wednesday, March 30, 2011
Painting Engine Parts and Brake Problems
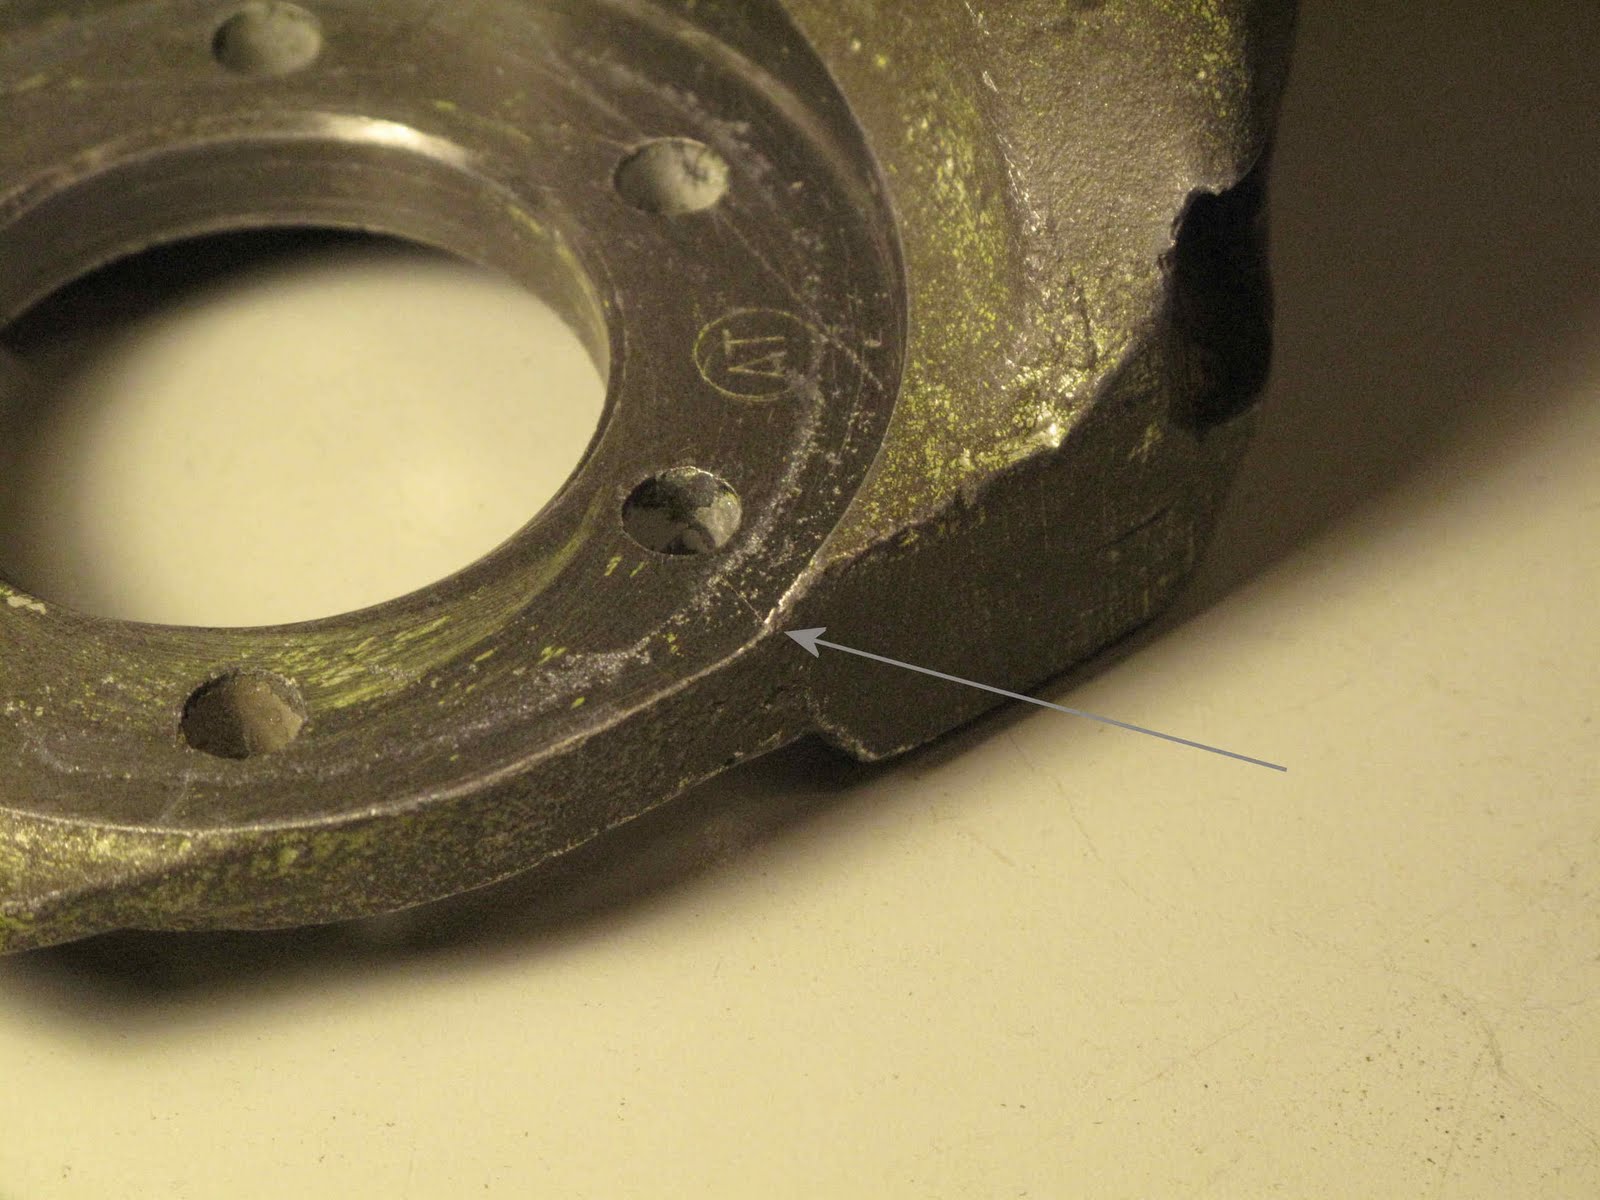
I've started painting the black parts for the engine, rocker covers, intake tubes, etc. The cylinders are next. I wasn't happy with the Cleveland wheels I had cleaned up and installed so I could get this thing back on the gear. The plane came with a mismatched set of Goodyear wheels and 4 brake calipers. I found wheels to match the Goodyears so I decided to clean up the brake calipers. After degreasing and stripping the old paint I quickly condemned all 4 calipers. All four have cracks in the casting at the edge of the machined area and the closest hole. Each is only cracked on one hole. I'm sure if I thought about how the braking loads are applied it would be obvious which were on the right and which were on the left. But who cares, I have more metal for the recycling bin. I've drawn arrows to the crack to help anyone else looking at their parts. 



Thursday, March 24, 2011
Engine Case Painted
 I couldn't find Continental Gray engine enamel, but I did find a Dupli-Color New Ford Grey at Advance Auto which is lighter than the Lycoming gray. It came out great. It was another paint with the recommendation to spray 2 light coats and then one medium coat ten minutes apart. After all the time spent masking I understand why Continental switched to Gold Alodine on the aluminum parts and their ugly Gold paint on steel parts. Even with clamp on masks there is a lot to mask. I pounded some dents out of the oil sump and I'm cleaning the Accessory case and other parts which get Grey paint. Fortunately the only inspection I needed to do was to make sure nothing got damaged after all these years setting. So far everything is fine. I'll probably paint the black parts before I start reassembly so the engine doesn't set open very long.
Sunday, March 20, 2011
Brake Lines In Gear Box
 The new brake lines are fabricated and installed in the gear box. It took a few hours of careful work to get them so they follow the correct path and attach where they are supposed to. Fortunately 1/4" tubing is easy to work with.
 I'm priming the fuselage under the 2 skin panels before I rivet them back on. After the riveting is done the gear can finally go back on.
Thursday, March 17, 2011
Fuel Lines & Selector Valve Back In
While the plane sat so many years the mud daubers had gotten into the fuel lines and brake lines buried in the landing gear box. With the skins (IPC fig 15-23) covering the gear box sides removed these are easy parts to replace so the gear has remained off while I get them done. The mud daubers had made it all the way to the fuel selector valve. Other than cleaning, the selector valve is in very good condition. The only problem was getting the rusty cotter pin out from the handle as well as the screw which broke at the cotter pin hole. After an easy out failed to remove the screw, I carefully drilled it to just short of the tap hole diameter for the 8-32 screw and then used a tap to gently remove the remaining threads of the screw. I need to verify that the valve seals but there were no scratches on the sealing surfaces. The fuel lines might have been cleaned but it seemed better to just fabricate new ones.  I have this cheap tube bender which at least bends the right radius. The edges of the grooves scraped the sides of the tubing so some improvements were needed. I filed a slight radius on the corners of the grooves, then polished each radius with scotch bright and finally with the Dremel tool and polishing compound. To assure the aluminum tubing moved easily in the aluminum bender I also oiled the groove with a light machine oil, Problem solved.
.
I have this cheap tube bender which at least bends the right radius. The edges of the grooves scraped the sides of the tubing so some improvements were needed. I filed a slight radius on the corners of the grooves, then polished each radius with scotch bright and finally with the Dremel tool and polishing compound. To assure the aluminum tubing moved easily in the aluminum bender I also oiled the groove with a light machine oil, Problem solved.
.
 The tool looks like it should be just held in your hand and bend the tube. That works fine for 1/4" thin tubing but not for the 3/8" x. 035" tubing used for the fuel lines. To get a tight radius you need to hold the bender against a solid surface to force the tube to stay in the groove while forming the bend.
  The result is a bend as well formed as the factory bends.
.
.
.
.
.
.
.
The result is a bend as well formed as the factory bends.
.
.
.
.
.
.
.
 To prevent chafing on the fuselage structure the factory slipped lengths of thin rubber tubing over the aluminum before forming the flared ends. Lowes has a vinyl tubing of the same diameter and thickness which works perfect for this purpose.
This worked fine for the new tubes, but some of the old tubes had been stored away from the mud daubers and didn't need to be replaced. The anti chafing tubing on some of those was cracked. On these old tubes people in the past had used various clamps, etc. to hold the anti-chafe tubing tight.
To prevent chafing on the fuselage structure the factory slipped lengths of thin rubber tubing over the aluminum before forming the flared ends. Lowes has a vinyl tubing of the same diameter and thickness which works perfect for this purpose.
This worked fine for the new tubes, but some of the old tubes had been stored away from the mud daubers and didn't need to be replaced. The anti chafing tubing on some of those was cracked. On these old tubes people in the past had used various clamps, etc. to hold the anti-chafe tubing tight.
 Instead I used some heat shrink tubing slipped over the old tube and shrunk to a tight fit. The heat shrink I used was 1-1/4" wide laying flat. It was left over from my hang gliding days in the 70's so I don't remember the diameter.
 This size fit nicely over the fittings and shrunk tight. Start shrinking in the middle, work around and then out. They came out great. I think these last 2 pictures are slightly out of focus.

 I have this cheap tube bender which at least bends the right radius. The edges of the grooves scraped the sides of the tubing so some improvements were needed. I filed a slight radius on the corners of the grooves, then polished each radius with scotch bright and finally with the Dremel tool and polishing compound. To assure the aluminum tubing moved easily in the aluminum bender I also oiled the groove with a light machine oil, Problem solved.
.
I have this cheap tube bender which at least bends the right radius. The edges of the grooves scraped the sides of the tubing so some improvements were needed. I filed a slight radius on the corners of the grooves, then polished each radius with scotch bright and finally with the Dremel tool and polishing compound. To assure the aluminum tubing moved easily in the aluminum bender I also oiled the groove with a light machine oil, Problem solved.
.
 The tool looks like it should be just held in your hand and bend the tube. That works fine for 1/4" thin tubing but not for the 3/8" x. 035" tubing used for the fuel lines. To get a tight radius you need to hold the bender against a solid surface to force the tube to stay in the groove while forming the bend.
  The result is a bend as well formed as the factory bends.
.
.
.
.
.
.
.
The result is a bend as well formed as the factory bends.
.
.
.
.
.
.
.
 To prevent chafing on the fuselage structure the factory slipped lengths of thin rubber tubing over the aluminum before forming the flared ends. Lowes has a vinyl tubing of the same diameter and thickness which works perfect for this purpose.
This worked fine for the new tubes, but some of the old tubes had been stored away from the mud daubers and didn't need to be replaced. The anti chafing tubing on some of those was cracked. On these old tubes people in the past had used various clamps, etc. to hold the anti-chafe tubing tight.
To prevent chafing on the fuselage structure the factory slipped lengths of thin rubber tubing over the aluminum before forming the flared ends. Lowes has a vinyl tubing of the same diameter and thickness which works perfect for this purpose.
This worked fine for the new tubes, but some of the old tubes had been stored away from the mud daubers and didn't need to be replaced. The anti chafing tubing on some of those was cracked. On these old tubes people in the past had used various clamps, etc. to hold the anti-chafe tubing tight.
 Instead I used some heat shrink tubing slipped over the old tube and shrunk to a tight fit. The heat shrink I used was 1-1/4" wide laying flat. It was left over from my hang gliding days in the 70's so I don't remember the diameter.
 This size fit nicely over the fittings and shrunk tight. Start shrinking in the middle, work around and then out. They came out great. I think these last 2 pictures are slightly out of focus.

Tuesday, March 15, 2011
Engine In Pieces
 The engine is apart (the picture is before I split the case). I've started cleaning everything so I can inspect, measure , and re-paint. The prop hub is off to be overhauled (inspected & replated) so I can't reassemble until it returns and can bolt it to the stand.
The only problem I've run into is finding some of the lubricants and sealants required by Teledyne Continental service letter SIL99-2B. A.E.R.O. had the silk thread (641543), 3D Permatex to stick down the thread, engine oil, and Paste-Gasket (642188). I'm still looking for Molyshield Grease and Dow Corning G-N Paste.
I now have a lifetime supply of silk thread. In the past it came with the gasket set. I guess I'll just have to find more engine projects to use it up on. I like that idea.
The engine is apart (the picture is before I split the case). I've started cleaning everything so I can inspect, measure , and re-paint. The prop hub is off to be overhauled (inspected & replated) so I can't reassemble until it returns and can bolt it to the stand.
The only problem I've run into is finding some of the lubricants and sealants required by Teledyne Continental service letter SIL99-2B. A.E.R.O. had the silk thread (641543), 3D Permatex to stick down the thread, engine oil, and Paste-Gasket (642188). I'm still looking for Molyshield Grease and Dow Corning G-N Paste.
I now have a lifetime supply of silk thread. In the past it came with the gasket set. I guess I'll just have to find more engine projects to use it up on. I like that idea.
Friday, March 11, 2011
Engine Work Begins
I've started taking the engine back apart. It's hard to imagine this project has sat so long but it was March of 1991 when Bolduc overhauled the cylinders. Maybe when we put it back together this time it won't sit so long without flying. I just want to make sure there is no rust or any other damage from sitting so long.
Tuesday, March 8, 2011
Engine Gaskets, etc.
The gaskets, etc. arrived to day from Fresno Airparts. It's always like Christmas when parts arrive. Now I need to get working on the engine so it can go back together. Everything has been overhauled but it has been setting for many years. I'll inspect all of it especially for corrosion and re-measure everything just to be sure it's correct then hopefully have it reassembled soon.
Saturday, March 5, 2011
Putting Things Back in the Fuselage
It's nice to finally be putting things back in the fuselage. The new nut plates for the gear leg wedge bolts are epoxy primed (no more rust) and riveted in. I have the materials to make the new brake lines. The float fittings were almost as much trouble to re-install as they were to remove, very tight quarters for big hands to work. The control yoke, flap lever, and all the other little parts I took out are cleaned, epoxy primed and painted. I love the Poly Fiber Epoxy Primer but I've never been happy with any of the enamel paints I've used over it on fittings. John Gaertner of Blue Swallow Aircraft turned me on to an epoxy spray paint from VHT Products Company. You can get it at most auto parts stores, they have a where to buy it page on their web site. You spray a light coat, wait 10 minutes another light coat, wait 10 minutes and then a final medium coat and let it dry to a very hard finish in gloss black or satin black.
Monday, February 28, 2011
Cleaning Fuselage Cabin Area
Between breaking a bone in my arm at Christmas, waiting for parts, and work, I feel like I'm going in slow motion. I have got the gear box area all cleaned and primed, very hard one  handed. To spray inside the channels above and below the gear leg I needed a dog leg spray gun. I took the nozzle and tube off a can of brake cleaner and added a rubber band. I was able to spray all the hidden areas after a couple tries and checks with an inspection mirror. I love cheap solutions that work.
While cleaning and inspecting the gear box area I could see rust on the float attach fittings in the belly. You really find out how much 2 hands are needed trying to get those bolts out but I got there. The parts cleaned up nicely and are primed and painted ready to reinstall when all the bolts arrive. The aluminum was mostly dirty and cleaned up well. After I primed it the weather turned back cold so I wrapped the area with rugs strapped to the belly and left a 60 watt bulb burning all night in the gear box. It stayed 59 degrees despite the freezing temps. outside and the epoxy was nicely set by morning.
To get the fittings out I had to remove the control column and push tube to the elevator cable bellcrank. The column and tube looked good but there was a tiny bit of flaking in the last coat of paint. I decided to clean them and repaint. Boy am I glad I did. It appears someone long ago sanded them and painted them gray. Unfortunately they did not re-prime them first and simply covered a lot of rust. They're cleaning up and I will probably replace the push tube.
I've also found, anything that should move is generally stuck. Fortunately I've also found the best unsticker in the world. Faith Olen-Glick (I'm flying her Champ) loaned me a can of Corrosion X. It is amazing. Not only did if free up the trim indicator in minutes and the universal joints in about an hour, I have a rudder bar for my WACO NINE project which has spent years being soaked with every known penetrating oil to no affect. I even checked it with a board for leverage before trying the Corrosion X, not a wiggle. Just 2 hours after spraying with Corrosion X it wiggled for the first time in decades and after a couple minutes was a free as new. It's the most expensive spray ($15.25) I've tried but it's worked perfectly. It is actually cleaning the rust off the rudder bar.
The result of all this is I'm removing everything related to the controls and cleaning and lubing everything. I don't want any rust or sticking in the controls. The bolts and other parts to start putting this all back together should be here tomorrow. Unlike building new parts I only discover what I need once things are apart.
handed. To spray inside the channels above and below the gear leg I needed a dog leg spray gun. I took the nozzle and tube off a can of brake cleaner and added a rubber band. I was able to spray all the hidden areas after a couple tries and checks with an inspection mirror. I love cheap solutions that work.
While cleaning and inspecting the gear box area I could see rust on the float attach fittings in the belly. You really find out how much 2 hands are needed trying to get those bolts out but I got there. The parts cleaned up nicely and are primed and painted ready to reinstall when all the bolts arrive. The aluminum was mostly dirty and cleaned up well. After I primed it the weather turned back cold so I wrapped the area with rugs strapped to the belly and left a 60 watt bulb burning all night in the gear box. It stayed 59 degrees despite the freezing temps. outside and the epoxy was nicely set by morning.
To get the fittings out I had to remove the control column and push tube to the elevator cable bellcrank. The column and tube looked good but there was a tiny bit of flaking in the last coat of paint. I decided to clean them and repaint. Boy am I glad I did. It appears someone long ago sanded them and painted them gray. Unfortunately they did not re-prime them first and simply covered a lot of rust. They're cleaning up and I will probably replace the push tube.
I've also found, anything that should move is generally stuck. Fortunately I've also found the best unsticker in the world. Faith Olen-Glick (I'm flying her Champ) loaned me a can of Corrosion X. It is amazing. Not only did if free up the trim indicator in minutes and the universal joints in about an hour, I have a rudder bar for my WACO NINE project which has spent years being soaked with every known penetrating oil to no affect. I even checked it with a board for leverage before trying the Corrosion X, not a wiggle. Just 2 hours after spraying with Corrosion X it wiggled for the first time in decades and after a couple minutes was a free as new. It's the most expensive spray ($15.25) I've tried but it's worked perfectly. It is actually cleaning the rust off the rudder bar.
The result of all this is I'm removing everything related to the controls and cleaning and lubing everything. I don't want any rust or sticking in the controls. The bolts and other parts to start putting this all back together should be here tomorrow. Unlike building new parts I only discover what I need once things are apart.
 handed. To spray inside the channels above and below the gear leg I needed a dog leg spray gun. I took the nozzle and tube off a can of brake cleaner and added a rubber band. I was able to spray all the hidden areas after a couple tries and checks with an inspection mirror. I love cheap solutions that work.
While cleaning and inspecting the gear box area I could see rust on the float attach fittings in the belly. You really find out how much 2 hands are needed trying to get those bolts out but I got there. The parts cleaned up nicely and are primed and painted ready to reinstall when all the bolts arrive. The aluminum was mostly dirty and cleaned up well. After I primed it the weather turned back cold so I wrapped the area with rugs strapped to the belly and left a 60 watt bulb burning all night in the gear box. It stayed 59 degrees despite the freezing temps. outside and the epoxy was nicely set by morning.
To get the fittings out I had to remove the control column and push tube to the elevator cable bellcrank. The column and tube looked good but there was a tiny bit of flaking in the last coat of paint. I decided to clean them and repaint. Boy am I glad I did. It appears someone long ago sanded them and painted them gray. Unfortunately they did not re-prime them first and simply covered a lot of rust. They're cleaning up and I will probably replace the push tube.
I've also found, anything that should move is generally stuck. Fortunately I've also found the best unsticker in the world. Faith Olen-Glick (I'm flying her Champ) loaned me a can of Corrosion X. It is amazing. Not only did if free up the trim indicator in minutes and the universal joints in about an hour, I have a rudder bar for my WACO NINE project which has spent years being soaked with every known penetrating oil to no affect. I even checked it with a board for leverage before trying the Corrosion X, not a wiggle. Just 2 hours after spraying with Corrosion X it wiggled for the first time in decades and after a couple minutes was a free as new. It's the most expensive spray ($15.25) I've tried but it's worked perfectly. It is actually cleaning the rust off the rudder bar.
The result of all this is I'm removing everything related to the controls and cleaning and lubing everything. I don't want any rust or sticking in the controls. The bolts and other parts to start putting this all back together should be here tomorrow. Unlike building new parts I only discover what I need once things are apart.
handed. To spray inside the channels above and below the gear leg I needed a dog leg spray gun. I took the nozzle and tube off a can of brake cleaner and added a rubber band. I was able to spray all the hidden areas after a couple tries and checks with an inspection mirror. I love cheap solutions that work.
While cleaning and inspecting the gear box area I could see rust on the float attach fittings in the belly. You really find out how much 2 hands are needed trying to get those bolts out but I got there. The parts cleaned up nicely and are primed and painted ready to reinstall when all the bolts arrive. The aluminum was mostly dirty and cleaned up well. After I primed it the weather turned back cold so I wrapped the area with rugs strapped to the belly and left a 60 watt bulb burning all night in the gear box. It stayed 59 degrees despite the freezing temps. outside and the epoxy was nicely set by morning.
To get the fittings out I had to remove the control column and push tube to the elevator cable bellcrank. The column and tube looked good but there was a tiny bit of flaking in the last coat of paint. I decided to clean them and repaint. Boy am I glad I did. It appears someone long ago sanded them and painted them gray. Unfortunately they did not re-prime them first and simply covered a lot of rust. They're cleaning up and I will probably replace the push tube.
I've also found, anything that should move is generally stuck. Fortunately I've also found the best unsticker in the world. Faith Olen-Glick (I'm flying her Champ) loaned me a can of Corrosion X. It is amazing. Not only did if free up the trim indicator in minutes and the universal joints in about an hour, I have a rudder bar for my WACO NINE project which has spent years being soaked with every known penetrating oil to no affect. I even checked it with a board for leverage before trying the Corrosion X, not a wiggle. Just 2 hours after spraying with Corrosion X it wiggled for the first time in decades and after a couple minutes was a free as new. It's the most expensive spray ($15.25) I've tried but it's worked perfectly. It is actually cleaning the rust off the rudder bar.
The result of all this is I'm removing everything related to the controls and cleaning and lubing everything. I don't want any rust or sticking in the controls. The bolts and other parts to start putting this all back together should be here tomorrow. Unlike building new parts I only discover what I need once things are apart.
Sunday, February 13, 2011
Landing Gear Wedge Bolt Nut Plates
 While removing the landing gear legs I had a problem removing the 2 bolts holding the wedges tight on the left side. The nut plates and bolts had rusted enough to bind the bolts and shear the rivets holding the nut plates. The bolts came loose enough to get the wedges out before I realized there was a problem. I should have gotten some oil on them before I started removing them. I had no problem on the right side but they were also rusty.
 The nut plates are riveted into the steel channel which is the upper gear support. I needed to get in enough to replace the nutplates on both the right and left gear. It also seemed a good chance to clean up any light rust and re-prime as needed. I thought about trying to remove the floor above the supports but removing the skin piece (0411611) covering the area was easier. I'll also replace the short piece of brake line which looks like it gets wet from water around the gear leg. Most of what looks rusty there is really primer sprayed in through the leg hole in the past. The bolts were easily cut off with a Dremel tool with a cut off disk. Now I know what to use to cut off a lock. It really went quickly through the 1/4" AN bolt.
.
The next step is to clean things up, epoxy prime and put in new nut plates. It looks like the skin can be riveted with the gear leg installed, but I'll probably rivet first.
The nut plates are riveted into the steel channel which is the upper gear support. I needed to get in enough to replace the nutplates on both the right and left gear. It also seemed a good chance to clean up any light rust and re-prime as needed. I thought about trying to remove the floor above the supports but removing the skin piece (0411611) covering the area was easier. I'll also replace the short piece of brake line which looks like it gets wet from water around the gear leg. Most of what looks rusty there is really primer sprayed in through the leg hole in the past. The bolts were easily cut off with a Dremel tool with a cut off disk. Now I know what to use to cut off a lock. It really went quickly through the 1/4" AN bolt.
.
The next step is to clean things up, epoxy prime and put in new nut plates. It looks like the skin can be riveted with the gear leg installed, but I'll probably rivet first.
Friday, February 4, 2011
Brake Master Cylinders Complete
 The brake master cylinders are reassembled and ready to install when I get the missing bearing block. Cessna sells new blocks for $2.27 per half but you need to order $25 minimum. I've been looking to see if there is anything else I need first.
The cylinders have new o-rings and the parking brake cables work now.
The brake master cylinders are reassembled and ready to install when I get the missing bearing block. Cessna sells new blocks for $2.27 per half but you need to order $25 minimum. I've been looking to see if there is anything else I need first.
The cylinders have new o-rings and the parking brake cables work now.
Tuesday, February 1, 2011
Parking Brake Cables
 Cleaning up the brake master cylinders was a simple enough matter. The housings had to be grit blasted to clean up the rust on the outside before epoxy priming. A lot of care was taken to seal them so no grit would get inside. New o-rings will be installed on the plunger. The biggest problem was the 2 bowden type cables attached to the cylinders to operate the parking brake locks on the plunger shafts.
.
.
.
.
.
.
.
.
 The cables were both stuck and I thought they were rusted up. I
started inspecting them by carefully bending the housing to look between the coils for the rusty area. None were found on either cable. What I did find was the cables had been painted some time while the plane was in service. The paint had gotten in the coils and bound up the cable core. It took a couple hours of careful work to brush the paint from the housing using a file card (file brush) while carefully bending the housing to open the coils. Once that was done graphite was worked into the housing and the cables work fine.
The cables were both stuck and I thought they were rusted up. I
started inspecting them by carefully bending the housing to look between the coils for the rusty area. None were found on either cable. What I did find was the cables had been painted some time while the plane was in service. The paint had gotten in the coils and bound up the cable core. It took a couple hours of careful work to brush the paint from the housing using a file card (file brush) while carefully bending the housing to open the coils. Once that was done graphite was worked into the housing and the cables work fine.When the o-rings get here I'll reassemble all of this.
Tuesday, January 25, 2011
Rudder Pedals Assembled
 The rudder pedals are reassembled and ready to install once I find the missing center bearing block.
.
.
.
.
.
.
.
The rudder pedals are reassembled and ready to install once I find the missing center bearing block.
.
.
.
.
.
.
.
 The bearing is a cast part. split in half with 2 holes for the tubes. The part number 0411264 is cast on the side of each half. The Top is -3 and the bottom-4. I'm missing the bottom. From the parts I have I can't tell that they were machined as pairs since all the halves line up well. It's obvious from wear marks which were the installed pairs, but otherwise there is no misalignment. Therefore if I could find even just a bottom it would probably work.
.
.
The bearing is a cast part. split in half with 2 holes for the tubes. The part number 0411264 is cast on the side of each half. The Top is -3 and the bottom-4. I'm missing the bottom. From the parts I have I can't tell that they were machined as pairs since all the halves line up well. It's obvious from wear marks which were the installed pairs, but otherwise there is no misalignment. Therefore if I could find even just a bottom it would probably work.
.
. These springs are the rudder pedal return springs which keep the pedals from falling toward the seats. They were a little rusty and at some time after the factory slobbered with paint. It was quicker to clean them up and epoxy prime them then look for new ones. I stretched them, between some clamps, enough to hold them open to grit blast and prime them. Once they are well cured I'll release them and they'll be ready to install with the pedals.
The next job is the brake master cylinders.
These springs are the rudder pedal return springs which keep the pedals from falling toward the seats. They were a little rusty and at some time after the factory slobbered with paint. It was quicker to clean them up and epoxy prime them then look for new ones. I stretched them, between some clamps, enough to hold them open to grit blast and prime them. Once they are well cured I'll release them and they'll be ready to install with the pedals.
The next job is the brake master cylinders.
Ready To Assemble Pedals
 All the parts are cleaned up and repainted. I found some nice aluminum colored Rust-Oleum to paint the cast pedals and their links. I epoxy primed the inner (brake) shafts because one was developing some rust even though they were cadmium plated. I also lightly greased the inside of the rudder bar to protect it without paint. One thing I would do differently is not painting the stubs on the rudder bar where the pedal tubes slip on. One light coat of epoxy primer would have been fine. They just fit to tight otherwise. They're all back together. I'm also missing one of the halves of the bearing blocks that mount to the floor structure. Hopefully it fell in the shop where the pedals were removed several years ago. No one even has any listed anywhere on line.
Tuesday, January 18, 2011
Rudder Pedals
 I'm changing the brakes to Cleveland brakes and need to get some shorter bolts for the axles, so we're on to the rudder pedals. I was going to just grease these and reinstall them. I keep finding enough cracked and corroded parts that I decided to take these apart to clean and inspect them. They are primary flight controls after all. We have the optional Right Seat brakes which is nice. So far the only problems I see just in taking them apart is some rust and the Oilite bushings for the brakes are dried out and the tubes were very sticky to turn.
  The bushings just press into the the rudder bars and hold the brake shaft in. It has a step on it which made it easy to press out the bushings. That may have been it's purpose since the arms on each end hold the shaft in.
Now that all parts are disassembled, bagged or tagged I'm ready to start cleaning to inspect. The parts book really helps to figure out how all this works.
Sunday, January 9, 2011
Wheels Ready to Assemble
 All the parts are painted ready to reassemble, after the paint drys a little more. New brake pads had been installed so I have new o-rings, felt seals and bolts. The wheel bearings will be repacked. It will be nice to put this plane back on it's own legs.
Saturday, January 8, 2011
Priming Wheels & Parts
 Business has finally slowed enough to get back to the landing gear. All the parts are cleaned and the first coat of epoxy primer sprayed.
 I found a nice little airbrush at Michael's craft store for $25. It is set up to work with expensive little air cans. With a piece of 1/8" tubing and a couple fittings I modified it to work with the air compressor or my little portable air tank.
 .
I cut off the can fitting at the end of the thin tube on the brush. Then I opened one end of the 1/8" tube, with the tube fitting I used on the other end, so I could slip the small tube into it. A little super clue and some heat shrink tubing over the joint and it is tight past the 50 psi limit for the brush. With a quick disconnect fitting on the 1/8" tube I can hook it up to any air source. It works very well with 30 psi at the regulator and about 6 ft. of tubing. It atomizes the primer very fine so you get a nice smooth coat. I mix the primer in an 8 oz. jar so it pours easily into the small jar on the brush. I put any extra in the freezer until the next coat can be sprayed. I found it takes about 2 months in the freezer before you see it even start to thicken so a couple days in the freezer slows the epoxy's reaction enough to save wasting much primer.
Subscribe to:
Posts (Atom)

