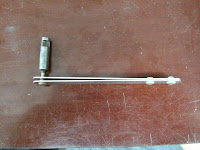
I don't have an actual knob so the best I can do is work from pictures. There are pictures on pages 21 & 24 of the owners manual and the drawing in figure 30 of the IPC. I'm making these from aluminum which will be riveted to the aluminum link and have holes for the center pivot pin to hold it securely. There are 2 parts to make this knob (handle seems more correct). One is a folded piece of .025" 5052-H32 aluminum sheet and the other is a piece of the .040" I used for the aluminum link.
The folded piece is 1" x 3-1/4" and the flat piece 1" x 1-3/8". The flat piece is just a stiffener to distribute the loads into the bent piece without it cracking from fatigue to quickly. The bend lines are 5/8" from the center and 5/8" from the ends. I used 5052 because I need to bend a tighter radius than 2024-T3 could handle without cracking.
For small parts like this the easiest tool to use is a pair of Vise-grip sheet metal pliers. I put as much radius on the blade edges as I could (+1/32"), they come with a sharp corner. It took a couple pieces to work out the dimensions to form the parts. I just line up the bend line with the edge of the blade and bend it over by hand, pushing the aluminum right at the bend to keep the radius tight.
There are 2 bends to make so I just bent them to about 45 degrees. The ends are close to forming a triangle.
Then the pliers are used to make the reverse bends. Line it up and bend while pushing the pliers in to finish each of the first bends. The bend angle isn't critical at this point because the stiffener needs to be inserted and the end bends squeezed tight. At that point the tab bends can be squared up.
With the stiffener inserted,The link is positioned to leave the knob overhanging the link about 1/16". There isn't room to get the Whitney punch in the channel so the stiffener need to be center punched and the removed and the hole punched. Then that hole enter punch is transferred to the knob. Again the punch won't fit in so in this case the hole must be drilled. Before riveting these 3 parts together the hole will need to be reamed with a #30 drill to get the rivet to fit.
To make the holes in the sides, the center of the hole on the inside part needs to be transferred to the outside of the knob sides. They sell a tool for this but it's such a simple tool to make I've never bought one. First I cut 2 strips of the scarp .040" aluminum about 1/2" wide and about 4" long. Three holes were laid out on one piece 1/4" from each end and 3/4" from one end along the center line. The holes were punched and then transferred to the second part.
An AN470-4-3 rivet will be squeezed in one of the ends with only one hole, but first the 2 strips need to be clecoed together and the edges at that end filed to the same width. I did this to assure the 2 holes, the with the rivet and the one without are lined up after riveting the other end together. The 2 holes at the other end are close enough together that the 2 strips can be misaligned while riveting. We're going to plug one of the holes at the other end so the only way to easily keep them aligned is just to make them the same width. The hole locator rivet needs to be squeezed so the worked end just snugly fits in the 3/16" holes in the link. The worked end of the rivet needs to be on the inside of the 2 strips.
With the handle end riveted together the 1/8" punch can be used to mark the center of the new hole. The holes that get riveted need to be reamed with a #30 drill. Don't drill the hole for the punch and it will fit so nice and snug you won't need extra hands to use this tool. With the knob clecoed to the link the locator rivet is fit into the pivot hole in the link and the punch lightly tapped to make a center mark. You need some kind of backing block to hammer against but you don't need much of a mark. You can re-punch it with a spring loaded punch if it helps to find the hole when punching the 3/16" holes.
The holes are perfectly aligned on both sides.
The last step is to round the corners on the knob. I soften all corners and edged. Sharp corners do not add any strength. They do add weight, I know it's not much but it all adds up. They also add safety hazards. I carry band-aids with me at all times but they are a pain to use when you are bouncing around the sky because some slacker didn't soften all edges and corners.
Ready to rivet and it all aligns perfectly. An AN470-4-4.5 rivet and the job is done. One more part and it will be ready to install.
Thursday, December 15, 2011
Subscribe to:
Post Comments (Atom)


The post showing how to make that part was just a little further down. Here's the link to it:
ReplyDeletehttp://n140tw.blogspot.com/2011/12/aluminum-window-latch-bracket-cessna.html
It was posted Friday, December 16, 2011 and titled:
Aluminum Window Latch Bracket (Cessna 0411360)
I think the explanation is fairly clear. It turned out to be a lot simpler than I expected. You might be able to get your part welded.
Thanks,
Dennis