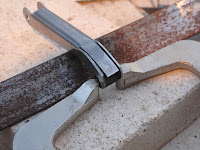
This part is the dog legged link which is attached to the 2 brackets on the door. The only reason I can see for it being made of steel is the bend in it which allows it to clear the top of the door when the window is open. This part is made from .050" steel. To get the same strength from aluminum it would have needed to be much thicker. Thicker aluminum would have been much harder to form even without the dog leg bend. It is probably mild steel but I have some .050" 4130 steel so that's what I'll use.
To form this part I need something stronger than hardwood. Instead I'll use a piece of mild steel. The inside of the channel shape is 7/16" wide and Tractor Supply only sells 1" x 1/2" bar stock. The easy solution would be to mill a piece to thickness but I don't own a mill so I used the band saw to cut off about 1/16" and used the belt sander to finish it to thickness. The 2 pivot holes were than drilled and tapped to use 3/16 fine thread bolts to hold the blank in place while forming.
The taper was then cut on the end to form the dog leg. The original part was bent in forming the dog leg. I'll form it by welding the edges from the start of the bend to the end of the short leg. The bend corners on the block were then filed to a 1/16" radius. If I were more ambitious I would have put about a 1 degree over bend on both sides to square up the bends a little better. For just a couple parts and the small amount of spring back it's easier to adjust the bends a little in the finished parts.
As with the aluminum link I start by making a template for the flat blank. Again I made a test bend with a piece about 2" square to figure out bend allowances.
In this case the 2 holes on one side are made from the template. The 2 holes on the other side will be drilled after forming the part.
My punch is old and a 3/16" hole in .050" 4130N is pushing it so I drilled the holes. The first hole is drilled, then the template is used to locate the second hole. I used the punch with a nib to mark the center of the second hole. A washer under the template allows clearance for the nib while keeping the punch in the template. In such thin stock I always use a center drill. They wander less and just make great holes.
With both holes drilled the cut line can now be scribed from the template. I like to use a blue permanent marker to ink where lines will be scribed.
With the blank cutout and filed it is bolted to the form block with 2 AN3 bolts to assure it does not move during forming. The other block of steel (to the left) is used to back the bend so it forms a tight bend. The little scrap of .050" steel is to shim the backing block so it sets flat and tight against the part to be formed.
In the vise the backing block needs to be positioned so the top edge is close to the bend line.
I used a wood block to hammer on to form the bend.
The second bend was started at this point but can only go a few degrees with the block in this position.
With the block rolled 90 degrees the bend can be finished.
The finished part is then clamped in the vise and the top edge lightly tapped with the finishing hammer to tighten up the bend.
The top of the dog leg was then lightly hammered to the form block. The sides of the bend area were a little above the top after the bend and I ground them down to make a neater job of welding.
The original, the form, and the bent part ready for welding.
Before welding I made a couple more parts.
Before welding I needed the holes drilled in the second side. I couldn't use the form block and 3/16 punch to mark the hole because the holes are threaded. The tap hole size for 10-32 threads is a #21 drill, slightly larger than 5/32". I took a cheap 5/32" drill and cut it off shot to get rid of most of the flutes so it would be shorter and not wander much and not wear out the threads in the block. I didn't want the hole to open up much and allow the drill to wander or it wouldn't make an accurate center mark.
I re-sharpened the drill with my Drill Doctor. I then bolted the part to the block, removed the bolt for the hole I was marking, and drilled just enough to make a center mark . The hole was drilled through with the center drill as done on the aluminum link.
My first method for holding the spacing on the welded end was to use a 6-32 screw through a piece of tubing ground to .438" long with the belt sander. This worked fine but on the second part the screw would not come apart.
For the other 2 parts (for my homebuilt project) I just used some vice grips to hold the tube snug. OK, so I'm a slow learner, I'll use the pliers in the future.
The finished parts came out great. Now I need to paint thee steel parts, make the knobs and the block that mounts to the window frame. The knobs are next while I wait for the material for the block and all the hardware to assemble everything.
Wednesday, December 14, 2011
Subscribe to:
Post Comments (Atom)


No comments:
Post a Comment