 Yesterday I was able to get a second coat of white Poly-Tone on the right wing. Today I finished the left wing. They'll have some time to dry over Thanksgiving. After that we'll watch the weather for some warm days to get the yellow sprayed. At least they could be flown like this if the rest of the plane is ready before warm weather, fat chance.
Sunday, November 21, 2010
Second Coat of White on Wings
Yesterday I was able to get a second coat of white Poly-Tone on the right wing. Today I finished the left wing. They'll have some time to dry over Thanksgiving. After that we'll watch the weather for some warm days to get the yellow sprayed. At least they could be flown like this if the rest of the plane is ready before warm weather, fat chance.
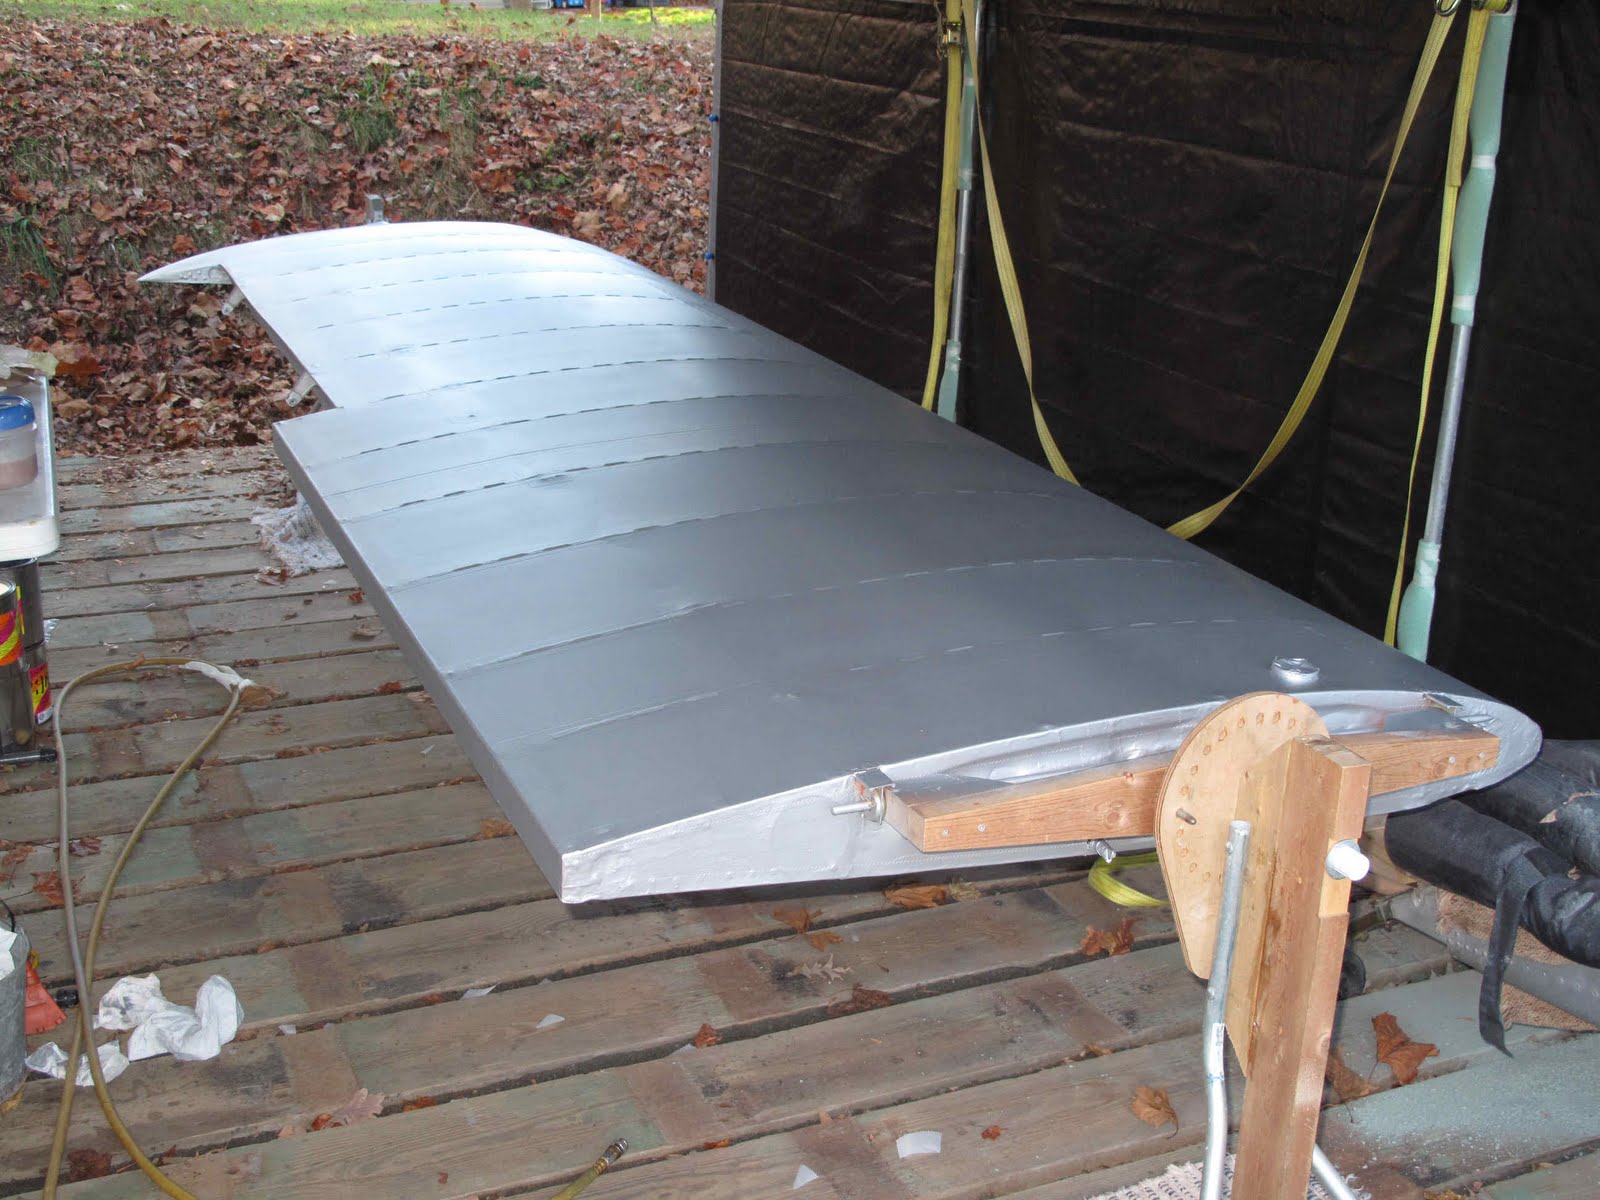
Monday, November 15, 2010
First Coat of White
 I took this picture at this odd angle from the porch of the attic because I could see the faint grey spots in the white. Jim and Dondi had warned me that the yellow is very transparent since they eliminated lead from the pigments. Their point was that any shadow from the silver will show through the yellow. When I first sprayed on the white it looked so good I thought I could get away without a second coat. After talking to Jim he convinced me that there were visible shadows in the white. After looking at this picture they don't show in it. Anyway it is supposed to rain the next 2 days so we'll let the wings dry and hope its warm enough Thursday to spray a second coat of white. I've got a lot of work piled up in the shop so I guess the rain will give me a chance to earn some money to pay for all this good fun.
Sunday, November 14, 2010
Gear Legs Primed
 Both wings have now been sanded and resprayed with Poly-Spray. If the weather holds I'll start spraying color with Poly-Tone.
The gear legs are cleaned up and the step rivet holes inspected for cracks, fortunately none were found. I've sprayed the first coat of epoxy primer on the legs. I like epoxy primer better than zinc chromate. They'll get one more coat before putting them back on the fuselage.
I have 2 sets of wheels and brakes with the project, one set of Goodyear and one set of Cleveland. We'll try using the Cleveland assuming they clean up to be serviceable. I've started bead blasting the parts to remove paint and corrosion. At least the rotors cleaned up fine.
Both wings have now been sanded and resprayed with Poly-Spray. If the weather holds I'll start spraying color with Poly-Tone.
The gear legs are cleaned up and the step rivet holes inspected for cracks, fortunately none were found. I've sprayed the first coat of epoxy primer on the legs. I like epoxy primer better than zinc chromate. They'll get one more coat before putting them back on the fuselage.
I have 2 sets of wheels and brakes with the project, one set of Goodyear and one set of Cleveland. We'll try using the Cleveland assuming they clean up to be serviceable. I've started bead blasting the parts to remove paint and corrosion. At least the rotors cleaned up fine.
Saturday, November 13, 2010
Sanding Wings
 Thank heaven for a stand which easily rotates to a nice angle for working. I started with the leading edge at a lower angle, reaching from the leading edge side. Than between the spars at this angle from the trailing edge side. Last I tipped up the trailing edge to a comfortable angle and sanded behind the rear spar. Just a light sanding along the edge of the tapes and the open areas to get any specs of trash under the poly. You can really see any brush bristles left in the Poly-Brush, I thought I found all of them earlier.
Once it dried I sprayed another full cross coat of Poly-Spray. They really look good, not perfect, but I like how they're coming along. Tomorrow the other wing. These cool short days really slow things down.
Thank heaven for a stand which easily rotates to a nice angle for working. I started with the leading edge at a lower angle, reaching from the leading edge side. Than between the spars at this angle from the trailing edge side. Last I tipped up the trailing edge to a comfortable angle and sanded behind the rear spar. Just a light sanding along the edge of the tapes and the open areas to get any specs of trash under the poly. You can really see any brush bristles left in the Poly-Brush, I thought I found all of them earlier.
Once it dried I sprayed another full cross coat of Poly-Spray. They really look good, not perfect, but I like how they're coming along. Tomorrow the other wing. These cool short days really slow things down.
Thursday, November 11, 2010
Spraying Wings
The weather wasn't as warm today but I managed to get a second coat of Poly-Spray on the first wing and the first coat on the second. Tomorrow I'll be able to sand any spots which need it on the first wing and get a second coat on the other. They look good and are well covered so I feel very good about the results.
Wednesday, November 10, 2010
First Coat of Poly-Spray
 Good fun today. Now the wings are looking like wings. The Poly-Spray was easy to spray. We're getting warm enough weather to get one coat a day. If it holds I still may get to spray the color this fall.
 I'm also cleaning the rust from the gear legs. It's slow because I don't want to use to much sand blast pressure and I'm blasting the areas at a shallow angle to avoid peening the surface while scrubbing off the rust. They're cleaning up nice, just slow.
 Sunday, November 7, 2010
Removed The Main Gear
 The past three weeks have been very busy in the embroidery shop. Things have slowed enough to get some time on the fuselage. It's been to cold to spray on the wings. We may have to move them back up to the attic for the winter. Most everything has already been removed from the fuselage. There are a few steel parts which need to be removed and repainted, rusty. The gear legs are one of those and it seemed better to start there. We needed to remove them to properly clean them and epoxy prime the metal.
 To remove the gear you need to get at the main bolt in the fuselage. The Bolts that hold the wedges in are easy to get at from outside. The wedges jam the spring steel tight in the frame so the legs don't rattle around on landing. To hold up the fuselage and get the doors open the easiest place to support it is at the rear spar attach fittings, behind the doors. Two 2x4 rails were laid on the ground and vertical pieces cut to fit over the spar fittings. Diagonal braces were added to stabilize the posts and everything is screwed together. I put a bolt through the 2 cross braces just to make it more rigid.

Some weight was needed on the tail even without the engine or anything in the cabin. I used a 5/16" bolt so there wouldn't be any severe loads on the spar fittings. The fuselage just sets on the bolts.
 .
..
.
.
.
.
.
.
 With the doors open it was easy to get to the bolts. You need a 3/8" allen wrench for the bolt and a 12 point 9/16" wrench for the nut. A little tapping on the inside of the gear leg with a soft mallet got the wedges out and then it's just a matter of sliding the leg out. I thought I might need to support the gear but they don't move once the bolts are out.
 The mains are off and in the shop for cleaning and painting. I'll also clean up the wheels and repack the bearings so once it's all done we won't need to take any of it apart before the plane flys.
Monday, October 25, 2010
Temporary Cover for the Fuselage
 To make it easier to keep the cabin area clean and dry I made a nice fitted cover from a heavy duty 8'x10' poly tarp from Lowes. I used duct tape to tape it in position to neatly form the pleats. I then sewed the pleats with some (Poly Fiber) machine sewing thread with my cheap Singer machine. Now I just slip it over the cabin and hold it snug with a bungee around the bottom rear and one on each gear leg.
 It's much easier to install and remove than a loose tarp and it doesn't flap in the breeze which is what gets them torn on sharp corners, etc.
Final Spray Coats of Poly Brush
 Before I sprayed the first coat of Poly Brush I looked very carefully for any bare spots along the spars and re-brushed them to fill them in. What I found was I should have put Poly Brush on the spars like on the leading edge, etc. Anything on the lower (flat) surface within 1/8" and anything on the top (scalloped) surface within 1/4" of the fabric should have 2 coats of Poly Brush. The poly drips on such surfaces as you brush and then wicks adjoining areas clean. After several careful applications the bare spots fill and blend in nicely under the spray coats.
 To make life easier mixing 3:1 I marked up a stirring stick by carefully pouring 1/2 gallon of well mixed Poly into a clean empty can (lower mark). Then I made a higher mark at a distance equal to 1/3 of the lower height. Then all I had to do was add the Reducer to the second mark and I have very consistent 3:1 mix.
 I also found it helpful to filter the Poly Brush mix into an empty reducer can for pouring into the cup of my HVLP spray gun. Quick and easy No Mess pouring, easy to open and close the can, easy to keep well shaken. I'll do another can for the Poly Spray.
 .
.
 .
..
.
 Both wings now have 2 full spray coats. We're ready to start the Poly Spray the next warm dry day. They are not perfect but I'm very happy. Much more fun than just doing bits of all these steps in training classes.
Tuesday, October 19, 2010
Some Problem Spots
 There are a few spots which need a touch up with the 225 deg. iron. I also found a few spots where the first brushed coat did not fully encapsulate the fabric. All the spots where where the fabric is close to but not touching some structure. Almost all of these were along the spars. The fabric only sits about .040" from the spar, the thickness of the rib plus anti chafe tape. When the first coat of poly-brush was brushed on, the liquid on the back of the fabric appears to have transferred to the structure leaving the fabric nearly dry. In the first 2 pictures it left little more than pin holes. The third picture shows a spot over the spar which has a large dry spot. I've gone back and lightly brushed some 3:1 Poly-brush over the areas and feathered it as best I could. I think I can smooth the edges a little with the iron and or some reducer. I'll check the other wing before I spray and fix any spots I can find which should prevent it from ever showing. There appears to be poly brush actually on the fibers just not enough to seal it.


Monday, October 18, 2010
First Spray Coats
 Yea! Finally we're spraying. There is hope these wings will get done. I got to use my new HVLP spray gun also. Well it was new in 1997. It's just taken a while to get to this project. The gun was a going away present from the people I worked with at Genicom, before I started my embroidery business.
The instructions are to put on a medium coat of poly-brush, dry 2 hours then a full wet coat. Surprising how much redder it looks and the poly brushed over the tapes are blended very well.
Yea! Finally we're spraying. There is hope these wings will get done. I got to use my new HVLP spray gun also. Well it was new in 1997. It's just taken a while to get to this project. The gun was a going away present from the people I worked with at Genicom, before I started my embroidery business.
The instructions are to put on a medium coat of poly-brush, dry 2 hours then a full wet coat. Surprising how much redder it looks and the poly brushed over the tapes are blended very well.
 The next dry day we'll get the second coat on.
Saturday, October 16, 2010
Fuselage Brought Home
 Yesterday I went back to Bill Oliver's house and brought home the Fuselage and all it's associated parts. With that we have the whole plane at the house, along with the Fly Baby and WACO NINE. Can life possibly get any better? We wrapped the fuselage with 4 mil plastic and duct tape to make sure nothing fell off or got broke in the wind. For less than $20 it was cheap insurance and worked great. The trailer is my sister in-law's boat trailer which we keep in our back yard (we live at a lake).
 The main gear was ratchet strapped to a plank on the trailer. The tail wheel was strapped to the spare tire and separately to the tongue of the trailer.
 .
.
.
.
 .
.
.
..
.
.
.
.
.
 To get the mains on and off the trailer we used some car ramps with one end raise with blocks to make it easier for 2 old guys to do.
 To get the mains on and off the trailer we used some car ramps with one end raise with blocks to make it easier for 2 old guys to do.
 To keep the wheels from sliding various blocks were screwed to the main cross board. That 2x10 was Bolted to the frame with 3/8" U-bolts.
 .
..
.
.
.
.
.
.
 The fuselage is now ready to move into the tent once the spraying is done on the wings.
 The upholstery on the seats appears to be original from 1947. I need to do some research on original fabrics. They are in very good condition if they are original.
Wednesday, October 13, 2010
Ready To Spray Wings
 It's almost amazing. Both wings are ready to start spraying. The tapes are all on with a coat of poly-brush over them. They've all been ironed to smooth the edges and any other lumpy spots. The grommets have been added in the low corner of each bay. The seaplane grommets are installed on the drains for the fuel tank bay and dollar patches are applied to all grommets in the slipstream. Everything is ready for the poly-brush to be sprayed on. Well almost everything, the weather forecast for tomorrow is bad. Time to tune up the spray gun and make sure it will work well with poly-brush.

Thursday, October 7, 2010
Tapes on RH Wing
 I need to start these things earlier in the day. I keep running out of daylight. The patches went much faster with everything prepared. The chordwise tapes I pre-cut to length and roll up with a paper clip to keep them out of the dirt. You wouldn't want them to get wet and rust but even I'm not that slow.
 One of the nice things with polyester fabric is the ability to stretch and shrink it to fit nicely around things rather than making lots of cuts in the tapes.
.
.
.
.
 The tapes are done. I still need to iron the edges smooth, put on another coat of poly-brush over the tapes and add drain grommets. Then I can spray both wings with poly-spray and color. It's nice to have them looking like wings.

Wednesday, October 6, 2010
RH Wing Ready For Patches & Tapes
 They say tomorrow will be warmer and hopefully I can get the tapes all on. One coat of Poly Brush goes under all the tapes and patches. Pencil or chalk lines were laid out for all of them using 2" wide straight edge. The poly brush gets feathered along the edges so it was a little slow. Sometimes even having fun is like work. It came out real good and gives you a reason to think through where patches and tapes will go. The 2 inspection rings are on and all the patches are cut out. Tomorrow when this poly brush is dry applying everything should move right along.


Tuesday, October 5, 2010
Fabric Clips on RH Wing Ribs
 I realized I never showed any pictures of fixing the hole spacing for the rib clips. I worried a lot about clips being loose but the real problem was all the clips which were added after the plane left the factory. The hols were to fare apart to get the clips to stay in. By measuring the hole edge to edge distance the bad holes were all found to be greater than 1.245" - 1.265" tolerance. It takes a little care to get just the tips of the calipers in the holes.
.
I realized I never showed any pictures of fixing the hole spacing for the rib clips. I worried a lot about clips being loose but the real problem was all the clips which were added after the plane left the factory. The hols were to fare apart to get the clips to stay in. By measuring the hole edge to edge distance the bad holes were all found to be greater than 1.245" - 1.265" tolerance. It takes a little care to get just the tips of the calipers in the holes.
.
 Next the clip edge of the holes are each lightly filed with a rat tail file and then remeasured, etc. It sounds tedious but you quickly get a feel for it and I never over did any of them. All the factor hole fit the clips fine as is.
 .
..
.
.
.
 The clips are each hooked in one hole and popped in the next. When the hole spacing is correct they snap in and hold very well.
 There are 139 on the top side and 68 on the bottom. Except for fixing some else's poor hole drilling this is really fast compared to rib stitching.
.
.
 .
.
.
.
.
.
 Once the clips are all on you need to apply 4 coats of Poly Brush to the reinforcing tapes. This fills them so they don't suck the Poly Brush out of the surfaced tapes. I find a cheap 1" brush with the bristles cut off to 1/2" long works great. It hold enough liquid to do about 8" on the first coat and about 24" after that. It just covers the tape with no mess on the fabric and is real easy to control.
Subscribe to:
Posts (Atom)

